Custom Hat Patches: Spice Up Your Hat Game
Forget boring hats! Hats are a way to show off your unique style, and custom patches are the perfect way to personalize them. This guide will walk you through all the different types of patches available, so you can create a hat that’s one-of-a-kind.


Embroidery Patches for Hats: Classic and Versatile
Think of embroidered patches like tiny, stitched pictures for your hat. They come in all sorts of colors and designs, from logos and team mascots to funny sayings or your own custom artwork.
Pros:
- Highly durable and long-lasting
- Rich texture and depth
- Suitable for detailed designs
Best For:
- Baseball caps
- Snapbacks
- Beanies

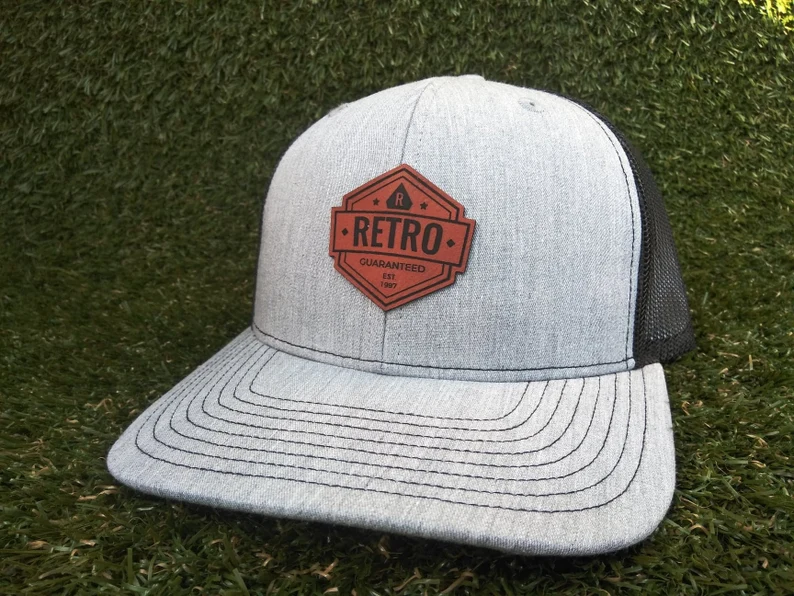
Leather Patches for Hats: Stylish and Elegant
Want a hat that looks sharp? Leather patches add a touch of sophistication. They can be engraved with your initials, a cool design, or even a logo
Pros:
- Elegant and high-end appearance
- Extremely durable
- Unique and stylish
Best For:
- Snapbacks
- Trucker hats
- Dad hats

Chenille Patches for Hats: Soft, Fuzzy Fun
Remember those varsity jackets with the fuzzy letters? Chenille patches bring that same playful texture to hats. They offer a retro and sporty look, making them a fun choice for casual and streetwear styles.
Pros:
- Soft and plush texture
- Eye-catching and bold
- Great for simple, bold designs
Best For:
- Snapbacks
- Beanies
- Trucker hats
- Bucket Hat

PVC Patches for Hats: Durable and Weather-Resistant
These patches are made of a special plastic that can handle anything you throw at it – rain, mud, you name it! They come in all sorts of shapes and colors, and can even be 3D for an extra cool effect.
Pros:
- Highly durable and weather-resistant
- 3D effect for added visual interest
- Wide range of colors and shapes
Best For:
- Trucker hats
- Outdoor hats
- Athletic caps
Sublimation Patches for Hats: Bringing Your Design to Life
Got a super detailed design or a photo you want on your hat? Sublimation patches use a special printing process to create crazy-vibrant images. The design is fused right into the fabric, so you won’t have to worry about it peeling or cracking.
Pros:
- Highly detailed and vibrant designs
- Smooth finish
- No color limitations
Best For:
- Baseball caps
- Snapbacks
- Performance hats
Woven Patches for Hats : Fine Detail and Durability
Pros:
- Fine detail and smooth finish
- Durable and long-lasting
- Professional appearance
Best For:
- Baseball caps
- Corporate hats
- Uniform hats
Picking the Perfect Patch for Your Cap: A Matchmaker’s Guide
Choosing the right hat for your custom patch is like picking the ideal outfit for a special occasion. The two elements need to complement each other, creating a cohesive and stylish statement. This guide dives deeper into popular hat styles and the patch types that best suit them, ensuring your headwear speaks volumes about your personality.
Baseball Caps
Baseball caps are versatile hats that you can customize with different patch styles. Embroidered patches look great on their clean lines, while woven patches add sophistication with intricate details. And if you want something eye-catching, sublimated patches offer vibrant, photo-realistic designs. Your cap becomes a great conversation piece!
The Snapback: Edgy and Modern
Snapbacks are cool hats with an adjustable style. Leather patches instantly make them look luxurious and rebellious. Chenille patches give a playful, retro vibe, perfect for those who love bold and casual fashion. And if you want something truly unique, PVC patches come in various shapes, including 3D designs, allowing you to push the boundaries of hat fashion!
The Trucker Hat: Laid-Back Comfort
Trucker hats are all about casual comfort with a touch of breathability. Leather patches complement the laid-back style perfectly, while adding a hint of ruggedness. PVC patches also pair well with trucker hats, especially for those who love a pop of color or a distinctive design. Woven patches create a clean and polished look, making trucker hats surprisingly versatile for both casual outings and even subtle brand promotion.”
The Beanie: Cozy Chic
Beanies are the ultimate winter staple, keeping you warm and stylish. For these cozy companions, embroidered patches with wintery themes or playful sayings add a touch of personality. Chenille patches are another great choice, their soft texture adding to the overall comfort factor of the beanie.
Beyond the Basics: Finding Your Perfect Match
Remember, the best patch isn’t just about the hat style. Think about what you want to show off:
- Brand Promotion? Woven patches with your logo are the way to go.
- Sports Fan? Rock an embroidered patch of your favorite team mascot.
The most important thing? The patch and hat combo should reflect your unique style!
Which hat materials work best with patches
When it comes to adding patches to hats, the material plays a crucial role in how well the patches adhere and look. Here are some materials that work exceptionally well:
- Cotton: Cotton hats, like baseball caps, are popular for patches. They provide a smooth surface for embroidery or other patch types.
- Polyester: Polyester hats, such as snapbacks, are lightweight and durable. They handle embroidered patches, sublimated patches or woven patches very well.
- Mesh: Trucker hats with mesh panels allow for breathability. Leather patches or PVC patches can be added to the front foam panel.
- Knit: Beanies made of knit fabric are cozy and stretchy. Embroidered patches, chenille patches or woven patches work nicely on these.
Remember to choose a hat material that suits your style and patch preferences!
What’s the best way to attach patches to hats?
1- Fabric Glue Method
Gluing Your Patch On: A Step-by-Step Guide
Fabric glue is a quick and easy way to attach a patch to your hat. Here’s how to do it like a pro:
1. Prep Your Workspace:
- Find a clean, flat surface to work on. This will help you ensure your patch goes on straight.
- Lay your hat down with the area where you want the patch facing up. Make sure it’s flat and wrinkle-free for a smooth application.
2. Apply the Glue:
- Grab your fabric glue. Most come in a squeeze bottle, but the application method might differ slightly depending on the brand.
- For best results: Apply the glue to the back of the patch in a thin layer. Focus on the edges first, creating a nice border of glue. You can also add a few dabs of glue in the center for extra hold.
- Alternatively: You can spread a thin, even layer of glue directly onto the area of the hat where the patch will go.
3. Patch Placement:
- Carefully pick up your patch and position it on the hat. Line it up exactly where you want it to be.
- Once you’re happy with the placement, gently but firmly press down on the patch to secure it to the hat. Hold it for a few seconds to make sure the glue starts to set.
4. Cleaning Up:
- Excess glue can sometimes squeeze out from the edges when you press down. Don’t worry, it’s easy to clean up!
- Grab a damp cloth and gently wipe away any excess glue that might have seeped out.
5. Patience is Key:
- The final step is to let the glue cure completely. This usually takes about 24 hours, depending on the type of fabric glue you used.
- Resist the urge to wear your hat right away! Letting the glue cure fully will ensure your patch stays securely attached for a long time.
Bonus Tip: For added security, especially on thicker patches or hats that move around a lot, you can also use a sewing machine to stitch around the edges of the patch after the glue has cured. This will create a double-reinforced bond.
Our Best Glue
- Aleene’s Fusion Permanent Fabric Adhesive
- Fabri-Tac
2-Adhesive Sheet :
Adhesive sheets: The No-fuss Patch Attachment Method
Feeling crafty but not a sewing whiz or an ironing expert? Adhesive sheets is here to save the day! Here’s how to use this handy tool to attach your patch to your hat in a flash:
1. Prep Your Hat:
Just like with the glue method, find a clean, flat surface to work on. Lay your hat flat with the area where you want the patch facing upwards. Make sure there are no wrinkles or folds for a smooth application. While Badge Magic is a great option, feel free to use your preferred adhesive sheet. It’s important to remember that no adhesive is guaranteed to be permanent. Over time, there’s a chance any sheet could come loose.
2. Badge Magic Time!
Grab your Badge Magic. This product typically comes in a small, round container with a tacky surface.
3. Fuse and Press:
Here’s the magic part:
- Following the specific instructions for your Badge Magic (as there might be slight variations depending on the brand), gently press the tacky surface of the Badge Magic onto the back of your patch.
- Make sure the entire back of the patch makes contact with the Badge Magic.
- Now, carefully pick up the patch (with the Badge Magic attached) and position it on your hat exactly where you want it.
- Once you’re happy with the placement, gently but firmly press down on the patch to secure it to the hat. Hold for a few seconds to ensure a good bond.
4. Enjoy Your Hat!
That’s it! Badge Magic creates a secure hold without any sewing or ironing required. Now you can rock your customized hat with pride.
Here are some additional points to keep in mind:
- Badge Magic is generally considered a temporary or semi-permanent solution. If you expect your hat to go through a lot of wear and tear, you might want to consider using a more permanent method like sewing or fabric glue.
- Always check the instructions for your specific Badge Magic product, as there might be slight variations in application methods.
Heat Press Magic: The Speedy Patch Solution (For Pre-Made Patches)
Got a pre-made embroidered patch and a heat press? You’re in luck! This method is a quick and easy way to attach your patch and create a custom hat in no time.
- Gather Your Supplies:
- Your trusty heat press
- A pre-made embroidered patch (ensure it has iron-on backing/adhesive on the back)
- Heat-resistant teflon sheet (optional, but recommended to protect your heat press)
- Hat with the application area clean and wrinkle-free
- Prepping for Press Time:
- Place your hat on a flat, heat-resistant surface.
- If you’re using a teflon sheet, put it on top of the hat where the patch will go. This helps protect your heat press from any glue residue on the patch.
- Setting the Stage:
- Consult your heat press manual for specific temperature and time recommendations. These settings will typically depend on the type of fabric your hat is made of and the size of the patch. For more details about fabrics and their heat resistance, please read here https://bestcustompatches.com/iron-on-backing/
- As a general guideline, most heat-activated patches require temperatures around 300°F (149°C) and a pressing time of 30 seconds.
- Press On!
- Carefully position your patch on the hat exactly where you want it.
- Lower the heat press platen (the heated pressing surface) and apply firm, even pressure for the recommended time.
- Cooling Down:
- Once the pressing time is complete, carefully lift the heat press platen.
- It’s important to let the patch cool down completely before touching or moving the hat. This allows the adhesive to set properly.
Congratulations! You’ve successfully attached your patch using a heat press. Now you can show off your customized hat creation!
Here are some additional things to keep in mind:
- Always double-check the instructions for your specific heat press and the heat-activated adhesive on your patch.
- For delicate fabrics or thicker patches, you might want to use a pressing cloth between the heat press and the patch for extra protection.
3-The Sew-On Method: A Timeless Patch Attachment Technique
The sew-on method is a tried-and-true way to attach patches to hats. It might take a little more time and effort than other methods, but it creates a very secure and long-lasting bond. Here’s what you’ll need:
- Needle and thread: Choose a needle size that’s appropriate for the thickness of your patch and hat fabric. Thread color can either match the patch or the hat, depending on the look you’re going for.
- Scissors: Sharp fabric scissors will come in handy for cutting thread.
- Thimble (optional): This can protect your finger while pushing the needle through the fabric.
- Your hat: Make sure the area where you want the patch is clean and wrinkle-free.
- The patch: Choose a patch with a sturdy backing suitable for sewing.
Sewing Steps:
- Plan Your Placement: Decide exactly where you want the patch to be on your hat. You can use pins to hold the patch in place temporarily to ensure you’re happy with the positioning.
- Thread Your Needle: Cut a length of thread about 18 inches long and thread it through your needle. Tie a knot at the end of the thread to secure it.
- Sewing Basics: There are a few different sewing stitches you can use to attach a patch. Here are two popular options:
- Basic Running Stitch: This is a simple stitch that goes in and out of the fabric in a straight line. It’s a good option for beginners and works well for most patch types.
- Blanket Stitch: This stitch creates a decorative border around the edge of the patch. It’s a bit more intricate than the running stitch but adds a nice finishing touch.
- Start Sewing: Begin sewing by pushing the needle through the back of the patch and then down through the hat fabric. Pull the thread until the knot catches, then bring the needle back up through the patch and repeat the process.
- Secure the Thread: Once you’ve sewn around the entire perimeter of the patch, tie a knot on the underside of the hat fabric to secure the thread. You can also tuck the end of the thread under a few stitches for a cleaner look.
Bonus Tip: If you’re a sewing beginner, there are plenty of online tutorials that can show you how to do these stitches in detail!
4- Embroidery Machine: The Speed Demon
Attach Custom Patches to Hats: Embroidery Machine vs. Shops
Looking to personalize a hat with a cool patch? Two main options exist: using an embroidery machine or visiting an embroidery shop.
Embroidery Machine (DIY):
- Pros: Secure, permanent attachment. Ideal if you already use an embroidery machine.
- Cons: Requires practice and design prep. Not suitable for beginners.
Embroidery Shop:
- Pros: Easy, convenient. No need for equipment or design skills.
- Cons: May have additional costs.
Whichever method you choose, here’s a basic overview:
For Embroidery Machines:
- Prepare your patch: Ensure it’s clean and compatible with your machine (PVC patches might require special settings).
- Design your patch: Create or obtain a digital outline design sized for your patch.
- Hoop your hat: Secure it properly in the embroidery machine.
- Temporary adhesive: Use a light adhesive to hold the patch in place.
- Embroider: The machine will stitch around the patch based on your design.
For Embroidery Shops:
- Provide your patch and desired placement.
- The shop will likely digitize your design (Patch outline) convert it for embroidery if needed.
- They’ll securely attach the patch using their equipment.
Ready to customize your hat? Choose the method that best suits your skills and preferences!